- lazy evaluation 延迟表达式求值
- std 的backtrace返回unknown问题调查
- 为别人的类型实现我的trait
- 在lib crate中使用build.rs
- rust会做越界检查
- C调用rust慢吗?
- 论Mutex的unlock
- impl块
- 调用libc函数
- 和C兼容data layout
- 生命周期标记
- 线程
- 宏
- 迭代器
- 闭包
- rust指针cheatsheet
- ownership
- 方法和瀑布式设计
- 小知识点
- trait
- 可以在函数定义里干任何事?
- 结构体定义和C对比
- crate和mod
- firecracker/src/utils/src/arg_parser.rs代码走读
- test
- std collections
- BTreeMap
1. lazy evaluation 延迟表达式求值
anyhow提供了两个函数:
- context()
- with_context()
声明在Context trait中:
pub trait Context<T, E>: context::private::Sealed {
    /// Wrap the error value with additional context.
    fn context<C>(self, context: C) -> Result<T, Error>
    where
        C: Display + Send + Sync + 'static;

    /// Wrap the error value with additional context that is evaluated lazily
    /// only once an error does occur.
    fn with_context<C, F>(self, f: F) -> Result<T, Error>
    where
        C: Display + Send + Sync + 'static,
        F: FnOnce() -> C;
}
在使用上是一样的, 比如:
    let root = ...
    std::fs::create_dir_all(&root)
            .with_context(|| format!("Failed to create dir {}", root.display()))?;
去掉表示闭包函数的||, 改成context调用, 效果是一样的.
    let root = ...
    std::fs::create_dir_all(&root)
            .context(format!("Failed to create dir {}", root.display()))?;
那么with_context有什么用?
答: 因为with_context的入参是个闭包函数, 这个函数只有在create_dir_all确实出现错误的时候才调用, 这个叫lazy evaluation. 当传入context的入参比较复杂, 计算它比较"昂贵"的时候, 用with_context. 不过在本例子中, context和with_context差不多, 一个是立即format字符串, 一个是把format字符串的闭包做为参数直接传入, 而关键是这个format字符串并不昂贵.
2. std 的backtrace返回unknown问题调查
遇到一个奇怪的问题, std::backtrace::Backtrace::capture()在chroot后, 不能正常显示调用栈:
yingjieb@RebornLinux:yingjieb_rust:61393 /repo/yingjieb/rebornlinux/chreborn
$ RUST_BACKTRACE=1 target/debug/chreborn -- ls
Error: Failed to set groups

Caused by:
    EPERM: Operation not permitted

Stack backtrace:
   0: <unknown>
   1: <unknown>
   2: <unknown>
   3: <unknown>
   4: <unknown>
   5: <unknown>
   6: <unknown>
   7: <unknown>
   8: <unknown>
   9: <unknown>
如果在chroot之前使用std::backtrace::Backtrace::capture()是可以显示调用栈的:
yingjieb@RebornLinux:yingjieb_rust:61393 /repo/yingjieb/rebornlinux/chreborn
$ RUST_BACKTRACE=1 target/debug/chreborn -- ls
Error: Failed to set groups

Caused by:
    EPERM: Operation not permitted

Stack backtrace:
   0: <E as anyhow::context::ext::StdError>::ext_context
             at /home/yingjieb/.cargo/registry/src/index.crates.io-6f17d22bba15001f/anyhow-1.0.79/src/context.rs:27:29
   1: anyhow::context::<impl anyhow::Context<T,E> for core::result::Result<T,E>>::context
             at /home/yingjieb/.cargo/registry/src/index.crates.io-6f17d22bba15001f/anyhow-1.0.79/src/context.rs:54:31
   2: chreborn::main
             at ./src/main.rs:51:5
   3: core::ops::function::FnOnce::call_once
             at /home/reborn/aports/community/rust/src/rustc-1.71.1-src/library/core/src/ops/function.rs:250:5
   4: std::sys_common::backtrace::__rust_begin_short_backtrace
             at /home/reborn/aports/community/rust/src/rustc-1.71.1-src/library/std/src/sys_common/backtrace.rs:135:18
   5: std::rt::lang_start::{{closure}}
             at /home/reborn/aports/community/rust/src/rustc-1.71.1-src/library/std/src/rt.rs:166:18
   6: std::rt::lang_start_internal
   7: std::rt::lang_start
             at /home/reborn/aports/community/rust/src/rustc-1.71.1-src/library/std/src/rt.rs:165:17
   8: main
   9: libc_start_main_stage2
             at /home/buildozer/aports/main/musl/src/1.2.4/src/env/__libc_start_main.c:95:2
而奇怪的是, 如果在chroot之前已经调用过一次std::backtrace::Backtrace::capture(), 那么再次调用也能正常显示调用栈.
2.1. 原因
std::backtrace::Backtrace::capture()会检查环境变量RUST_BACKTRACE. 我自己写的chroot在exec的时候会清空环境变量, 导致在这之后的std::backtrace::Backtrace::capture()调用就找不到RUST_BACKTRACE导致实际并没有解析调用栈. 而在chroot之前调用std::backtrace::Backtrace::capture()则不受影响.
3. 为别人的类型实现我的trait
anyhow能为普通的Error类型添加成员函数context(), 这样可以给?添加详细的debug信息, 比如:
use anyhow::{Context, Result};

fn main() -> Result<()> {
    ...
    std::fs::create_dir_all(&root)
            .with_context(|| format!("Failed to create dir {}", root.display()))?;
    // Unshare to create a new user namespace
    unshare(CloneFlags::CLONE_NEWUSER | CloneFlags::CLONE_NEWNS).context("Failed to unshare")?;

    // Change the root directory
    chroot(&root).with_context(|| format!("Failed to chroot to dir {}", root.display()))?;

    // Change the working directory to the new root
    chdir("/").context("Failed to chdir to /")?;

    ...
    return Ok(());
}
这段代码中的std::fs::create_dir_all的返回类型是std::io::Result<()>, 本来没有.with_context()这个函数. 但用了anyhow就有了, 为什么?
3.1. 在自己的库里定义自己的trait
代码在src/lib.rs
pub trait Context<T, E>: context::private::Sealed {
    /// Wrap the error value with additional context.
    fn context<C>(self, context: C) -> Result<T, Error>
    where
        C: Display + Send + Sync + 'static;

    /// Wrap the error value with additional context that is evaluated lazily
    /// only once an error does occur.
    fn with_context<C, F>(self, f: F) -> Result<T, Error>
    where
        C: Display + Send + Sync + 'static,
        F: FnOnce() -> C;
}
定义了trait Context.
3.2. 为别人实现自己的trait
代码在src/context.rs
impl<T, E> Context<T, E> for Result<T, E>
where
    E: ext::StdError + Send + Sync + 'static,
{
    fn context<C>(self, context: C) -> Result<T, Error>
    where
        C: Display + Send + Sync + 'static,
    {
        // Not using map_err to save 2 useless frames off the captured backtrace
        // in ext_context.
        match self {
            Ok(ok) => Ok(ok),
            Err(error) => Err(error.ext_context(context)),
        }
    }

    fn with_context<C, F>(self, context: F) -> Result<T, Error>
    where
        C: Display + Send + Sync + 'static,
        F: FnOnce() -> C,
    {
        match self {
            Ok(ok) => Ok(ok),
            Err(error) => Err(error.ext_context(context())),
        }
    }
}
E: ext::StdError + Send + Sync + 'static是说只要E实现了ext::StdError, 就可以返回Err(error.ext_context(context)).
下面这段同样在src/context.rs, 只是被包在mod ext { ... }中. 这段代码定义了自己的trait StdError, 并为通用的std::error::Error实现了这个trait, 返回anyhow定义的Error, 后者满足std::error::Error, 并提供了很多有用的方法.
mod ext {
    use super::*;

    pub trait StdError {
        fn ext_context<C>(self, context: C) -> Error
        where
            C: Display + Send + Sync + 'static;
    }

    #[cfg(feature = "std")]
    impl<E> StdError for E
    where
        E: std::error::Error + Send + Sync + 'static,
    {
        fn ext_context<C>(self, context: C) -> Error
        where
            C: Display + Send + Sync + 'static,
        {
            let backtrace = backtrace_if_absent!(&self);
            Error::from_context(context, self, backtrace)
        }
    }

    impl StdError for Error {
        fn ext_context<C>(self, context: C) -> Error
        where
            C: Display + Send + Sync + 'static,
        {
            self.context(context)
        }
    }
}
4. 在lib crate中使用build.rs
build.rs是个特殊的编译脚本, 在编译本crate之前被rustc调用, 用来控制编译过程, 比如做版本检查, 根据条件配置编译选项等.
build.rs需要和Cargo.toml在同一级目录.
4.1. anyhow使用build.rs的例子
anyhow是个lib crate, 提供了通用的error hanling机制. 挺好用的.
它的Cargo.toml里面写了default feature是std:
[features]
default = ["std"]
std = []
在它的build.rs里, 判断rustc版本来做不同的处理.
fn main() {
    let mut error_generic_member_access = false;
    //用sfg宏判断是否feature是std, 是std才编译后面的语句块
    if cfg!(feature = "std") {
        println!("cargo:rerun-if-changed=build/probe.rs");

    ...

    let rustc = match rustc_minor_version() {
        Some(rustc) => rustc,
        None => return,
    };

    if rustc < 51 {
        // core::ptr::addr_of
        // https://blog.rust-lang.org/2021/03/25/Rust-1.51.0.html#stabilized-apis
        println!("cargo:rustc-cfg=anyhow_no_ptr_addr_of");
    }

    ...

    if !error_generic_member_access && cfg!(feature = "std") && rustc >= 65 {
        // std::backtrace::Backtrace
        // https://blog.rust-lang.org/2022/11/03/Rust-1.65.0.html#stabilized-apis
        println!("cargo:rustc-cfg=std_backtrace");
    }
}
这段代码里面我们关注println!("cargo:rustc-cfg=std_backtrace");这句.
在其他的代码里面, 用cfg属性判断std_backtrace来做条件编译.
#[cfg(std_backtrace)]
pub(crate) use std::backtrace::{Backtrace, BacktraceStatus};

#[cfg(all(not(std_backtrace), feature = "backtrace"))]
pub(crate) use self::capture::{Backtrace, BacktraceStatus};

#[cfg(not(any(std_backtrace, feature = "backtrace")))]
pub(crate) enum Backtrace {}

#[cfg(std_backtrace)]
macro_rules! impl_backtrace {
    () => {
        std::backtrace::Backtrace
    };
}

#[cfg(all(not(std_backtrace), feature = "backtrace"))]
macro_rules! impl_backtrace {
    () => {
        impl core::fmt::Debug + core::fmt::Display
    };
}
5. rust会做越界检查
比如下面的代码中, cli.root是个String, 这个String支持index操作.
rust会对这个index操作做越界检查并panic.
    let root = if cli.root.starts_with("~/") {
        //应该是dirs::home_dir().unwrap().join(&cli.root[2..])
        //我故意改成&cli.root[1002..]
        dirs::home_dir().unwrap().join(&cli.root[1002..])
    } else {
        cli.root.into()
    };
运行上面的程序会报错:
$ target/debug/chreborn
thread 'main' panicked at 'byte index 1002 is out of bounds of `~/rebornlinux`', src/main.rs:20:41
note: run with `RUST_BACKTRACE=1` environment variable to display a backtrace
加RUST_BACKTRACE=full得到下面的调用栈
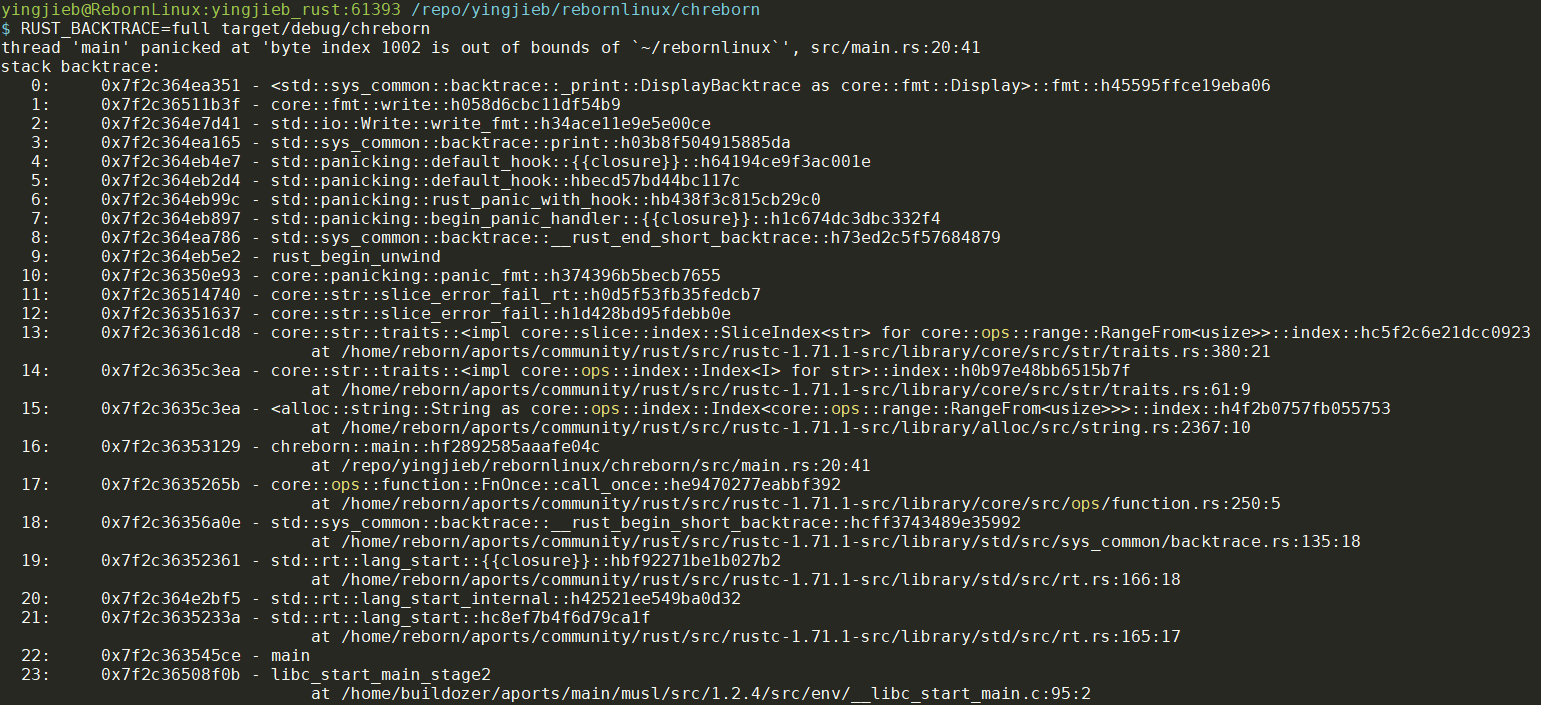
- String的底层类型是str, str实现了index操作:
impl core::ops::index::Index<I> for str - Rust的调用链不短. 用户main函数之前还有好几层.
- 默认panic不打印调用栈, 但提示信息已经很友好了
6. C调用rust慢吗?
不慢. 重点词: FFI #[repr(C)]
Let me expand on this a bit: The reason why FFI is slow in many languages (Java, C#, Go, etc) is that incoming data has to be registered to the runtime, maybe even copied into GC memory space, and then unregistered or again copied into the other direction.
Rust doesn't have a runtime, and it can handle C data structures directly (with #[repr(C)]). There is no conversion needed at all.
That said, sometimes you do want to conversions, like using Vec instead of a C array (although std::slice::from_raw_parts solves most of the use cases without a copy), but that's on you to implement, so you can see the costs directly.
7. 论Mutex的unlock
rust里面, mutex不需要手动unlock. 比如下面的代码:
use std::sync::Mutex;

fn main() {
    let my_mutex = Mutex::new(5); // A new Mutex<i32>. We don't need to say mut
    let mut mutex_changer = my_mutex.lock().unwrap(); // mutex_changer is a MutexGuard
                                                     // It has to be mut because we will change it
                                                     // Now it has access to the Mutex
                                                     // Let's print my_mutex to see:

    println!("{:?}", my_mutex); // This prints "Mutex { data: <locked> }"
                                // So we can't access the data with my_mutex now,
                                // only with mutex_changer

    println!("{:?}", mutex_changer); // This prints 5. Let's change it to 6.

    *mutex_changer = 6; // mutex_changer is a MutexGuard<i32> so we use * to change the i32

    println!("{:?}", mutex_changer); // Now it says 6
}
但我这里要讨论的是, my_mutex.lock().unwrap()这句返回的是MutexGuard, 它实现了Drop trait, 在out of scope后(即脱离变量作用域)被自动调用.
上面的代码, mutex_changer就是那个返回的MutexGuard, 它会存活到main函数的最后, 就是说到最后这个lock才会被解锁.
那怎么提前解锁呢?
把上面的代码改一下:
use std::sync::Mutex;

#[derive(Debug)]
struct MyType  {
    n: i32
}

fn main() {
    let my_mutex = Mutex::new(MyType{n: 5});
    let mut mutex_changer = my_mutex.lock().unwrap();
    println!("{:?}", my_mutex);
    println!("{:?}", mutex_changer);
    mutex_changer.n = 6;
    println!("{:?}", mutex_changer);
    println!("{:?}", my_mutex);
}

//输出
Mutex { data: <locked>, poisoned: false, .. }
MyType { n: 5 }
MyType { n: 6 }
Mutex { data: <locked>, poisoned: false, .. }
可以看到直到最后, my_mutex的锁还是保持的, 直到main结束, my_mutex退出作用域
7.1. 提前unlock
下面的代码中, my_mutex.lock().unwrap().n这句, lock().unwrap()得到的MutexGuard对象, 是在一句内的临时对象, 在取出n后就消亡了, 导致它的unlock()函数被调用.
所以最后输出里面, 显示my_mutex的状态不是data: <locked>, 而是显示data的值: data: MyType { n: 5 }
use std::sync::Mutex;

#[derive(Debug)]
struct MyType  {
    n: i32
}

fn main() {
    let my_mutex = Mutex::new(MyType{n: 5});
    let mutex_changer = my_mutex.lock().unwrap().n;
    println!("{:?}", my_mutex);
    println!("{:?}", mutex_changer);
}

//输出
Mutex { data: MyType { n: 5 }, poisoned: false, .. }
5
7.2. 结论
- 如果持有
MutexGuard对象, 比如let var = someLock.lock().unwrap()那么这个lock会一直hold到变量生命周期结束 - 如果在
unwrap()后还取了数据对象的field, 比如let var = someLock.lock().unwrap().someField, 那么锁在这一行就会unlock(), 可以理解为MutexGuard对象是临时对象, 已经消亡. - 这个就是所谓的RAII(Resource Acquisition Is Initialization)
An RAII implementation of a "scoped lock" of a mutex. When this structure is dropped (falls out of scope), the lock will be unlocked.
8. impl块
8.1. 内部函数
impl块中不全是带self参数的方法, 比如典型的new函数, 和一些内部函数.
比如virtiofsd中的结构体VhostUserFsThread, 有个函数return_descriptor(), 第一个入参就不是&self, 这个函数只在本impl块做为内部函数使用.
impl<F: FileSystem + Send + Sync + 'static> VhostUserFsThread<F> {
    fn new(fs: F, thread_pool_size: usize) -> Result<Self>
    fn return_descriptor(vring_state: &mut VringState, head_index: u16, event_idx: bool, len: usize,)
}
8.2. receiver
不知道rust里面叫什么, 但类似go的receiver概念, 在同一个impl块中, receiver可以是多个形态, 可以是&self, 也可以是&mut self等.
9. 调用libc函数
virtiofsd新建线程的时候, 会调用unshare()
impl<F: FileSystem + Send + Sync + 'static> VhostUserFsThread<F> {
    let ret = unsafe { libc::unshare(libc::CLONE_FS) };
    if ret == -1 {
        return Err(Error::UnshareCloneFs(std::io::Error::last_os_error()));
    }
}
这里调用了libc::unshare()函数
- libc是github上的一个crate, 提供了很多c的基础库函数. Rust能直接调用c库这点应该说是rust的一个优点
- 这个crate提供多个平台的libc接口, 比如
- unix
- vxworks
- windows
- fuchsia
- HermitCore: 应该是基于KVM的unikernel, for HPC和云环境. A Unikernel for Extreme-Scale Computing
- solid
- 这个crate提供多个平台的libc接口, 比如
- 调用c库要用unsafe包起来?
- 这个c库函数原型是
pub fn unshare(flags: ::c_int) -> ::c_int;注意返回值是c_int, 这个c_int的类型是pub type c_int = i32;
这个unshare本质上是个系统调用, 由libc代为提供. int unshare(int flags);的作用是让当前进程丢弃部分的和其他进程共享的运行上下文. 比如
- CLONE_FILES: 去除共享的fd. 即调用
unshare(CLONE_FILES)后, 调用进程和其他进程都不共享fd - CLONE_FS: 不再共享root目录, 当前目录, mask属性等. 和自己调用
chroot(),chdir(),umask()效果差不多? - CLONE_NEWIPC: 和clone加
CLONE_NEWIPC效果一样. 不再共享IPC名字空间 - CLONE_NEWNET: 和clone加
CLONE_NEWNET效果一样. 不再共享网络名字空间 - CLONE_NEWNS: 同上, 不再共享mount名字空间
- CLONE_NEWUTS: 同上, 不再共享UTS IPC namespace
- CLONE_SYSVSEM: 同上, 不再共享System V semaphore
有个unshareshell命令, 可以方便的用新的名字空间来启动一个新进程.
- 在新的pid空间运行程序, 显示pid是1
//Establish a PID namespace, ensure we're PID 1 in it against newly mounted procfs instance. # unshare --fork --pid --mount-proc readlink /proc/self 1 - 在新的user空间使用root用户. 注意当前是普通用户
//Establish a user namespace as an unprivileged user with a root user within it.
$ unshare --map-root-user --user sh -c whoami
root
10. 和C兼容data layout
virtiofsd的源码里, 经常会出现类似下面的代码:
#[repr(C)]
#[derive(Debug, Default, Copy, Clone)]
pub struct SecctxHeader {
    pub size: u32,
    pub nr_secctx: u32,
}

unsafe impl ByteValued for SecctxHeader {}
rust调用C的时候, 需要跨越FFI(Foreign Function Interface)
一般的, 如果只是在rust里调用C函数, 可以这样
use libc::size_t;

#[link(name = "snappy")]
extern {
    fn snappy_max_compressed_length(source_length: size_t) -> size_t;
}

fn main() {
    let x = unsafe { snappy_max_compressed_length(100) };
    println!("max compressed length of a 100 byte buffer: {}", x);
}
但如果是要使用C的结构体, 就要使用#[repr(C)]来声明一个和C一模一样的结构体. #[repr(C)]就是控制编译器如何生成data layout的.
这点rust做的比较好, 复合数据类型的data layout默认是repr(Rust), 用#[repr(C)]可以声明和C一模一样的数据布局.
server.rs里面, 就使用了前面的SecctxHeader的定义:
fn parse_security_context(data: &[u8]) -> Result<Option<SecContext>> {
    if data.len() < size_of::<SecctxHeader>() {
        return Err(Error::DecodeMessage(einval()));
    }
    let (header, data) = data.split_at(size_of::<SecctxHeader>());
    let secctx_header: SecctxHeader =
        unsafe { std::ptr::read_unaligned(header.as_ptr() as *const SecctxHeader) };

    if secctx_header.nr_secctx > 1 {
        return Err(Error::DecodeMessage(einval()));
    } else if secctx_header.nr_secctx == 0 {
        // No security context sent. May be no LSM supports it.
        return Ok(None);
    }
    ...
}
上面的代码把输入的data: &[u8]按size_of::<SecctxHeader>()截取两段, 第一段是header, 第二段是data.
然后把header强转成SecctxHeader: let secctx_header: SecctxHeader = unsafe { std::ptr::read_unaligned(header.as_ptr() as *const SecctxHeader) };
11. 生命周期标记
只有引用才有生命周期标记的说法, 其他都没有:
- 没有结构体生命周期标记的说法. 看见一个struct带标记, 实际上是对其内部的field的引用的标记
- 编译器会自动推导一般的生命标记. 比如:
去掉编译器语法糖的版本fn announce(value: &impl Display) { println!("Behold! {}!", value); } fn main() { let num = 42; let num_ref = # announce(num_ref); }fn announce<'a, T>(value: &'a T) where T: Display { println!("Behold! {}!", value); } fn main() { 'x: { let num = 42; 'y: { let num_ref = &'y num; 'z: { announce(num_ref); } } } }
12. 线程
use std::thread;

fn main() {
    let guard = thread::scoped(|| {
        println!("Hello from a thread!");
    });

    // guard goes out of scope here. 就是说在这里会等着上面的线程结束
}
scoped原型是
fn scoped<'a, T, F>(self, f: F) -> JoinGuard<'a, T>
    where T: Send + 'a,
          F: FnOnce() -> T,
          F: Send + 'a
Specifically,
F, the closure that we pass to execute in the new thread. It has two restrictions: It must be aFnOncefrom()toT. UsingFnOnceallows the closure to take ownership of any data it mentions from the parent thread. The other restriction is thatFmust beSend. We aren't allowed to transfer this ownership unless the type thinks that's okay.
如果用spawn就不会卡住了, main退出会强制退出线程.
fn main() {
    thread::spawn(|| {
        println!("Hello from a thread!");
    });

    timer::sleep(Duration::milliseconds(50));
}
13. 宏
比如Vec!宏:
let x: Vec<u32> = vec![1, 2, 3];
展开后是:
let x: Vec<u32> = {
    let mut temp_vec = Vec::new();
    temp_vec.push(1);
    temp_vec.push(2);
    temp_vec.push(3);
    temp_vec
};
对应的宏实现是:
macro_rules! vec {
    ( $( $x:expr ),* ) => {
        {
            let mut temp_vec = Vec::new();
            $(
                temp_vec.push($x);
            )*
            temp_vec
        }
    };
}
( $( $x:expr ),* ) => {...}里, $x:expr是类似match的语法, $(...),*是类似正则的语法, 表示match expr 0次或多次; $x是个临时变量.
=>右边的$()*表示重复每个匹配
13.1. 宏可以用小括号, 中括号, 大括号
比如Vec!宏, 下面几个形式都可以:
fn main() {
    // vector creation with vec! macro
    let v = vec!(1, 2, 3);
    println!("v2= {:?}", v);
}

fn main() {
    // vector creation with vec! macro
    let v = vec![1, 2, 3];
    println!("v2= {:?}", v);
}

fn main() {
    // vector creation with vec! macro
    let v = vec!{1, 2, 3};
    println!("v2= {:?}", v);
}
但用尖括号会报错.
通常Vec大家喜欢用中括号.
13.2. 简单例子
macro_rules! five_times {
    ($x:expr) => (5 * $x);
}

fn main() {
    assert_eq!(25, five_times!(2 + 3));
}
13.3. 例子1
macro_rules! foo {
    (x => $e:expr) => (println!("mode X: {}", $e));
    (y => $e:expr) => (println!("mode Y: {}", $e));
}

fn main() {
    foo!(y => 3); //这里的y => 3被宏做匹配
    //foo!(z => 3);这样调用不行, 会报错. error: no rules expected the token `z`
}

//输出
mode Y: 3
13.4. 例子2
macro_rules! o_O {
    (
        $(
            $x:expr; [ $( $y:expr ),* ]
        );*
    ) => {
        &[ $($( $x + $y ),*),* ]
    }
}

fn main() {
    let a: &[i32]
        = o_O!(10; [1, 2, 3];
               20; [4, 5, 6]);

    assert_eq!(a, [11, 12, 13, 24, 25, 26]);
14. 迭代器
for x in 0..10 {
    println!("{}", x);
}
for相当于在loop里不断的调用range这个迭代器的next方法.
let mut range = 0..10;

loop {
    match range.next() {
        Some(x) => {
            println!("{}", x);
        },
        None => { break }
    }
}
vec的iter方法返回一个迭代器:
let nums = vec![1, 2, 3];

for num in nums.iter() {
    //这里的num是个引用, println默认会解引用.
    println!("{}", num);
    //下面的写法也行
    println!("{}", *num);
}
Now we're explicitly dereferencing
num. Why doesiter()give us references? Well, if it gave us the data itself, we would have to be its owner, which would involve making a copy of the data and giving us the copy. With references, we're just borrowing a reference to the data, and so it's just passing a reference, without needing to do the copy.
见: https://www.cs.brandeis.edu/~cs146a/rust/doc-02-21-2015/book/iterators.html 有些概念挺有用的:
- Iterator adapters, 比如map, filter等API
- Consumers, 比如collect等
15. 闭包
let add_one = |x| { 1 + x };

println!("The sum of 5 plus 1 is {}.", add_one(5));
fn main() {
    let x: i32 = 5;

    let printer = || { println!("x is: {}", x); };

    printer(); // prints "x is: 5"
}
带move关键词的闭包的语义是take ownership:
a moving closure always takes ownership of all variables that it uses. Ordinary closures, in contrast, just create a reference into the enclosing stack frame.
每个闭包的type都是独特的, 下面的例子用了F和G两个fn, 虽然签名是一模一样的, 但F和G是两个不同的type, 对应了两个不同的闭包.
fn compose<F, G>(x: i32, f: F, g: G) -> i32
    where F: Fn(i32) -> i32, G: Fn(i32) -> i32 {
    g(f(x))
}

fn main() {
    compose(5,
            |n: i32| { n + 42 },
            |n: i32| { n * 2 }); // evaluates to 94
}
16. rust指针cheatsheet
| Type | Name | Summary |
|---|---|---|
&T |
Reference | Allows one or more references to read T |
&mut T |
Mutable Reference | Allows a single reference to read and write T |
Box<T> |
Box | Heap allocated T with a single owner that may read and write T. |
Rc<T> |
"arr cee" pointer | Heap allocated T with many readers |
Arc<T> |
Arc pointer | Same as above, but safe sharing across threads |
*const T |
Raw pointer | Unsafe read access to T |
*mut T |
Mutable raw pointer | Unsafe read and write access to T |
17. ownership
说的很细 https://www.cs.brandeis.edu/~cs146a/rust/doc-02-21-2015/book/ownership.html
18. 方法和瀑布式设计
https://www.cs.brandeis.edu/~cs146a/rust/doc-02-21-2015/book/method-syntax.html
19. 小知识点
19.1. Default值
有人问下面的代码怎么弄的更好点?
struct cParams {
    iInsertMax: i64,
    iUpdateMax: i64,
    iDeleteMax: i64,
    iInstanceMax: i64,
    tFirstInstance: bool,
    tCreateTables: bool,
    tContinue: bool,
}

impl cParams {
    fn new() -> cParams {
        cParams {
            iInsertMax: -1,
            iUpdateMax: -1,
            iDeleteMax: -1,
            iInstanceMax: -1,
            tFirstInstance: false,
            tCreateTables: false,
            tContinue: false,
        }
    }
}
回答是实现Default trait, 然后在初始化的时候调用..Default::default():
impl Default for cParams {
    fn default() -> cParams {
        cParams {
            iInsertMax: -1,
            iUpdateMax: -1,
            iDeleteMax: -1,
            iInstanceMax: -1,
            tFirstInstance: false,
            tCreateTables: false,
            tContinue: false,
        }
    }
}

let p = cParams { iInsertMax: 10, ..Default::default() };
注: rust里..表示范围, 在range和初始化的时候用的多.
比如
let r = 1..10; // r是一个Range<i32>,中间是两个点,代表[1,10)这个区间
let r = (1i32..11).rev().map(|i| i * 10);

let greeting: &str = "Hello";
let substr: &str = &greeting[2..];

let origin = Point3d { x: 5, ..default()};
19.2. Result必须处理, 否则有编译警告
rust要求调用函数时, 必须处理返回的Result, 比如这样的函数pub fn signal_used_queue(&self) -> io::Result<()>
如果像下面这样调用是不行的:
vring_state.signal_used_queue();
会有编译警告unused std::result::Result that must be used
signal_used_queue()这个函数返回值Result本身就是个空值或Err, 如果实在不像麻烦的处理返回这, 可以这样:
vring_state.signal_used_queue().unwrap();
unwrap()如果碰到Err会panic.
19.3. if else赋值
比如下面的代码:
    let mut vl = None;
    println!("{:?}", vl);
    if 5 > 1 {
        vl = Some(100)
    }
    println!("{:?}", vl);

    let vl2 = if 5 > 1 {
        Some(100) //这里写成Some(100,), 即多个逗号, 效果一样.
    } else {
        None
    };
    println!("{:?}", vl2);

//输出
None
Some(100)
Some(100)
vl是普通的赋值: 先赋默认值, 再根据条件更改. 这要求变量必须是mut的vl2是if else 赋值: 用rust的不带分号的值做为if else块的值来赋值给vl2,vl2不需要是mut, 但要注意else最后的括号后面要有分号.
实例:
        let pool = if thread_pool_size > 0 {
            Some(
                ThreadPoolBuilder::new()
                    .after_start(|_| {
                        // unshare FS for xattr operation
                        let ret = unsafe { libc::unshare(libc::CLONE_FS) };
                        assert_eq!(ret, 0); // Should not fail
                    })
                    .pool_size(thread_pool_size)
                    .create()
                    .map_err(Error::CreateThreadPool)?,
            )
        } else {
            None
        };
19.4. std库的catch_unwind
panic::catch_unwind可以捕获rust运行时的panic
use std::panic;

let result = panic::catch_unwind(|| {
    println!("hello!");
});
assert!(result.is_ok());

let result = panic::catch_unwind(|| {
    panic!("oh no!");
});
assert!(result.is_err());
19.4.1. catch_unwind和FnOnce
std::panic::catch_unwind(AssertUnwindSafe(f))
上面的代码是ok的, 只要F满足约束:
where
    F: FnOnce(),
    F: Send + 'static,
什么是FnOnce
pub trait FnOnce<Args> {
    type Output;
    extern "rust-call" fn call_once(self, args: Args) -> Self::Output;
}
Instances of FnOnce can be called, but might not be callable multiple times. Because of this, if the only thing known about a type is that it implements FnOnce, it can only be called once.
FnOnce只能被调用一次.
FnOnce is implemented automatically by closure that might consume captured variables, as well as all types that implement FnMut, e.g. (safe) function pointers (since FnOnce is a supertrait of FnMut).
闭包自动实现了FnOnce, Fn, FnMut中的一个.
Since both Fn and FnMut are subtraits of FnOnce, any instance of Fn or FnMut can be used where a FnOnce is expected.
Fn和FnMut是FnOnce的子trait
Use FnOnce as a bound when you want to accept a parameter of function-like type and only need to call it once. If you need to call the parameter repeatedly, use FnMut as a bound; if you also need it to not mutate state, use Fn. Also of note is the special syntax for Fn traits (e.g. Fn(usize, bool) -> usize).
FnOnce是个函数形式的trait, 和Fn一样拥有特殊语法:Fn(usize, bool) -> usize
详见: Closures: Anonymous Functions
catch_unwind
std::panic::catch_unwind()的入参类型是FnOnce() -> R + UnwindSafe这个特殊语法的Fn trait
pub fn catch_unwind<F: FnOnce() -> R + UnwindSafe, R>(f: F) -> Result<R> {
    unsafe { panicking::r#try(f) }
}
代码解释
std::panic::catch_unwind(AssertUnwindSafe(f))
AssertUnwindSafe是个元组结构体:
pub struct AssertUnwindSafe<T>(pub T);
它实现了FnOnce:
impl<R, F: FnOnce() -> R> FnOnce<()> for AssertUnwindSafe<F> {
    type Output = R;

    extern "rust-call" fn call_once(self, _args: ()) -> R {
        (self.0)()
    }
}
所以:
- FnOnce不一定非要是个闭包, 也可以是个结构体, 比如
struct AssertUnwindSafe - 记住Fn这个特殊的trait
19.5. std库的同步功能
在多线程的情况下, 希望所有线程在某个点"集合":
use std::sync::{Arc, Barrier};
use std::thread;

let mut handles = Vec::with_capacity(10);
let barrier = Arc::new(Barrier::new(10));
for _ in 0..10 {
    let c = Arc::clone(&barrier);
    // The same messages will be printed together.
    // You will NOT see any interleaving.
    handles.push(thread::spawn(move|| {
        println!("before wait");
        c.wait();
        println!("after wait");
    }));
}
// Wait for other threads to finish.
for handle in handles {
    handle.join().unwrap();
}
19.6. u32可以调用checked_add做溢出检查
//self.next_gsi类型是u32
self.next_gsi = self.next_gsi.checked_add(1).ok_or(Error::Overflow)?;
19.7. tuple返回值
一个函数如果想返回多个返回值, 可以这样:
fn prepare_default_values() -> (String, String, String) {
    let default_vcpus =
        format! {"boot={},max_phys_bits={}", config::DEFAULT_VCPUS,config::DEFAULT_MAX_PHYS_BITS};
    let default_memory = format! {"size={}M", config::DEFAULT_MEMORY_MB};
    let default_rng = format! {"src={}", config::DEFAULT_RNG_SOURCE};

    (default_vcpus, default_memory, default_rng)
}
使用的时候用模式匹配:
let (default_vcpus, default_memory, default_rng) = prepare_default_values();
19.8. 宏调用使用()或{}都行?
比如下面的代码, format和println宏, 用小括号和大括号调用, 作用一模一样.
    let default_vcpus = format! {"boot={},max_phys_bits={}", 8, 6.78};
    let default_vcpus2 = format!("boot={},max_phys_bits={}", 8, 6.78);
    println!("{}", default_vcpus);
    println! {"{}", default_vcpus2};
19.9. 该传值的时候传借用也行?
比如这个函数, 第二个参数guest_mem的类型要求是&GuestMemoryMmap
    pub fn memory_init(
        &mut self,
        guest_mem: &GuestMemoryMmap,
        kvm_max_memslots: usize,
        track_dirty_pages: bool,
    ) -> Result<()>
调用的时候:
//已知guest_memory是&GuestMemoryMmap类型
guest_memory: &GuestMemoryMmap

let mut vm = Vm::new()
//这样可以编译, guest_memory的借用传入
vm.memory_init(&guest_memory, kvm.max_memslots(), track_dirty_pages)

//这样也可以, 直接传入guest_memory, 这个应该是更符合函数signature
vm.memory_init(guest_memory, kvm.max_memslots(), track_dirty_pages)

//这样竟然也行
vm.memory_init(&&&&&&&&&guest_memory, kvm.max_memslots(), track_dirty_pages)
可能GuestMemoryMmap实现了Dref trait? 还是这种形式的传参都是被rust支持的?????
19.10. 方法impl块里面的Self
一个结构体的方法, 并不都是入参一定是Self, 比如类似new()方法, 返回值才是Self(或者&Self等) 比如:
pub struct VmResources {
    ...
}

impl  VmResources {
    //new函数
    pub fn from_json() -> std::result::Result<Self, Error> {
        ...实例化Self
    }

    //其他方法
    pub fn set_vsock_device(&mut self, config: VsockDeviceConfig) -> Result<VsockConfigError>

    //等等
}
调用"new"方法的时候, 用的是VmResources::from_json(), 调用其他方法的时候, 用的是对象.xxx().
而且, 一般的方法第一个入参是&mut self或者&self
它们都在一个impl块里.
19.11. 条件编译
比如只有在cfg的target_arch是aarch64时才编译:
#[cfg(target_arch = "aarch64")]
enable_ssbd_mitigation();
19.12. static变量
比如下面的代码:
use lazy_static::lazy_static;
lazy_static! {
    static ref _LOGGER_INNER: Logger = Logger::new();

    /// Static instance used for handling human-readable logs.
    pub static ref LOGGER: &'static Logger = {
        set_logger(_LOGGER_INNER.deref()).expect("Failed to set logger");
        _LOGGER_INNER.deref()
    };
}
- static说的是被static标记的变量在整个程序的周期内都有效
- ref说的是后面的变量在被match做pattern匹配的时候, 使用借用方式.
注: match默认采用move方式, 比如下面的maybe_name变量被match后就没法用了.
用ref就可以: 注意Some(ref n)那句let maybe_name = Some(String::from("Alice")); // The variable 'maybe_name' is consumed here ... match maybe_name { Some(n) => println!("Hello, {}", n), _ => println!("Hello, world"), } // ... and is now unavailable. println!("Hello again, {}", maybe_name.unwrap_or("world".into()));let maybe_name = Some(String::from("Alice")); // Using `ref`, the value is borrowed, not moved ... match maybe_name { Some(ref n) => println!("Hello, {}", n), _ => println!("Hello, world"), } // ... so it's available here! println!("Hello again, {}", maybe_name.unwrap_or("world".into())); _LOGGER_INNER.deref()这种神奇操作来自lazy_static!宏, 这是github上实现的第三方库, 用来在运行时声明static变量, 比如:
大义是自动实现了Deref trait, 在第一次deref的时候, 执行后面的EXPR, 后面再解引用的时候, 就直接返回第一次的值的引用.lazy_static! { static ref NAME: TYPE = EXPR; }
20. trait
20.1. 关联类型, 关联类型可以是trait?
有些trait里面定义了一个type, 这个就是关联类型. 关联类型在具体struct实现的时候是要在impl块里指定的.
pub trait Deref {
    /// The resulting type after dereferencing.
    type Target: ?Sized;

    /// Dereferences the value.
    fn deref(&self) -> &Self::Target;
}
DerefMut继承自Deref, 或者说Deref是DerefMut的supertrait. subtrait也拥有supertrait的关联类型.
pub trait DerefMut: Deref {
    /// Mutably dereferences the value.
    fn deref_mut(&mut self) -> &mut Self::Target;
}
virtiofsd里面, 定义了一个trait:
pub trait VringStateMutGuard<'a, M: GuestAddressSpace> {
    /// Type for guard returned by `VringT::get_mut()`.
    type G: DerefMut<Target = VringState<M>>;
}
这个trait里, 关联类型G要满足约束: DerefMut<Target = VringState<M>>看起来是一种特殊的"实例化"trait DerefMut的语法, 指定了其关联类型是Target = VringState<M>.
VringMutex结构体实现了上面的trait, 具体做法就是用实例化了的MutexGuard类型做为VringStateMutGuard的关联类型G;
/// A `VringState` object protected by Mutex for multi-threading context.
#[derive(Clone)]
pub struct VringMutex<M: GuestAddressSpace = GuestMemoryAtomic<GuestMemoryMmap>> {
    state: Arc<Mutex<VringState<M>>>,
}

impl<'a, M: 'a + GuestAddressSpace> VringStateMutGuard<'a, M> for VringMutex<M> {
    type G = MutexGuard<'a, VringState<M>>;
}

//MutexGuard是个结构体, 是在标准库里定义的
pub struct MutexGuard<'a, T: ?Sized + 'a> {
    lock: &'a Mutex<T>,
    poison: poison::Guard,
}
MutexGuard<'a, VringState<M>>;能当作G, 那它就必须满足type G: DerefMut<Target = VringState<M>>;约束, 查一下代码, 确实满足:
#[stable(feature = "rust1", since = "1.0.0")]
impl<T: ?Sized> Deref for MutexGuard<'_, T> {
    type Target = T;

    fn deref(&self) -> &T {
        unsafe { &*self.lock.data.get() }
    }
}

#[stable(feature = "rust1", since = "1.0.0")]
impl<T: ?Sized> DerefMut for MutexGuard<'_, T> {
    fn deref_mut(&mut self) -> &mut T {
        unsafe { &mut *self.lock.data.get() }
    }
}
这个VringStateMutGuard是下面的trait的supertrait(可以理解成父trait?)之一:
pub trait VringT<M: GuestAddressSpace>:
    for<'a> VringStateGuard<'a, M> + for<'a> VringStateMutGuard<'a, M>
{
    //这个trait定义了一个函数, 把Self当作VringStateMutGuard<M>, 并返回后者的关联类型
    /// Get a mutable reference to the kick event fd.
    fn get_mut(&self) -> <Self as VringStateMutGuard<M>>::G;
}
注:
for<'a> VringStateGuard<'a, M>中的for<'a>是Higher-ranked trait bounds(HRTB), 另外参考hrtb., 意思是for<'a> can be read as "for all choices of 'a", and basically produces an infinite list of trait bounds.
<Self as VringStateMutGuard<M>>::G这样的语法好像不常见. 意思是把Self当作VringStateMutGuard<M>, 然后取其关联类型G
做了前面这么多, 就是为了实现VringT<M>trait:
pub trait VringT<M: GuestAddressSpace>:
    for<'a> VringStateGuard<'a, M> + for<'a> VringStateMutGuard<'a, M>
{
    fn new(mem: M, max_queue_size: u16) -> Result<Self, VirtQueError>
    fn get_mut(&self) -> <Self as VringStateMutGuard<M>>::G;
    ...
}
而VringMutex<M>和VringRwLock<M>都实现了这个trait.
20.2. trait object
比如下面的代码中, 返回值Arc<dyn Hypervisor>是个trait object, 和golang的iface差不多的意思.
编译时选择虚拟化平台, 比如选了kvm, kvm的那个new函数返回具体的结构体.
pub fn new() -> std::result::Result<Arc<dyn Hypervisor>, HypervisorError> {
    #[cfg(feature = "kvm")]
    let hv = kvm::KvmHypervisor::new()?;

    #[cfg(feature = "mshv")]
    let hv = mshv::MshvHypervisor::new()?;

    Ok(Arc::new(hv))
}
21. 可以在函数定义里干任何事?
比如可以在函数定义里定义结构体, 并实现一个trait
    fn write_fmt(&mut self, fmt: fmt::Arguments<'_>) -> Result<()> {
        // Create a shim which translates a Write to a fmt::Write and saves
        // off I/O errors. instead of discarding them
        struct Adapter<'a, T: ?Sized + 'a> {
            inner: &'a mut T,
            error: Result<()>,
        }

        impl<T: Write + ?Sized> fmt::Write for Adapter<'_, T> {
            fn write_str(&mut self, s: &str) -> fmt::Result {
                match self.inner.write_all(s.as_bytes()) {
                    Ok(()) => Ok(()),
                    Err(e) => {
                        self.error = Err(e);
                        Err(fmt::Error)
                    }
                }
            }
        }

        let mut output = Adapter { inner: self, error: Ok(()) };
        match fmt::write(&mut output, fmt) {
            Ok(()) => Ok(()),
            Err(..) => {
                // check if the error came from the underlying `Write` or not
                if output.error.is_err() {
                    output.error
                } else {
                    Err(error::const_io_error!(ErrorKind::Uncategorized, "formatter error"))
                }
            }
        }
    }
22. 结构体定义和C对比
同样的结构体, C的定义和rust定义分别如下:
struct sock_fprog {
    unsigned short      len;    /* Number of BPF instructions */
    struct sock_filter *filter; /* Pointer to array of
                                   BPF instructions */
};

struct sock_filter {            /* Filter block */
    __u16 code;                 /* Actual filter code */
    __u8  jt;                   /* Jump true */
    __u8  jf;                   /* Jump false */
    __u32 k;                    /* Generic multiuse field */
};
rust对应的定义更严谨(啰嗦):
/// BPF instruction structure definition.
/// See /usr/include/linux/filter.h .
#[repr(C)]
#[derive(Clone, Debug, PartialEq, Deserialize, Serialize)]
#[doc(hidden)]
pub  struct  sock_filter {
    pub  code:  ::std::os::raw::c_ushort,
    pub  jt:  ::std::os::raw::c_uchar,
    pub  jf:  ::std::os::raw::c_uchar,
    pub  k:  ::std::os::raw::c_uint,
}

/// Program made up of a sequence of BPF instructions.
pub  type  BpfProgram  =  Vec<sock_filter>;
23. crate和mod
23.1. bin文件的例子
firecracker工程下, 有个seccompiler目录: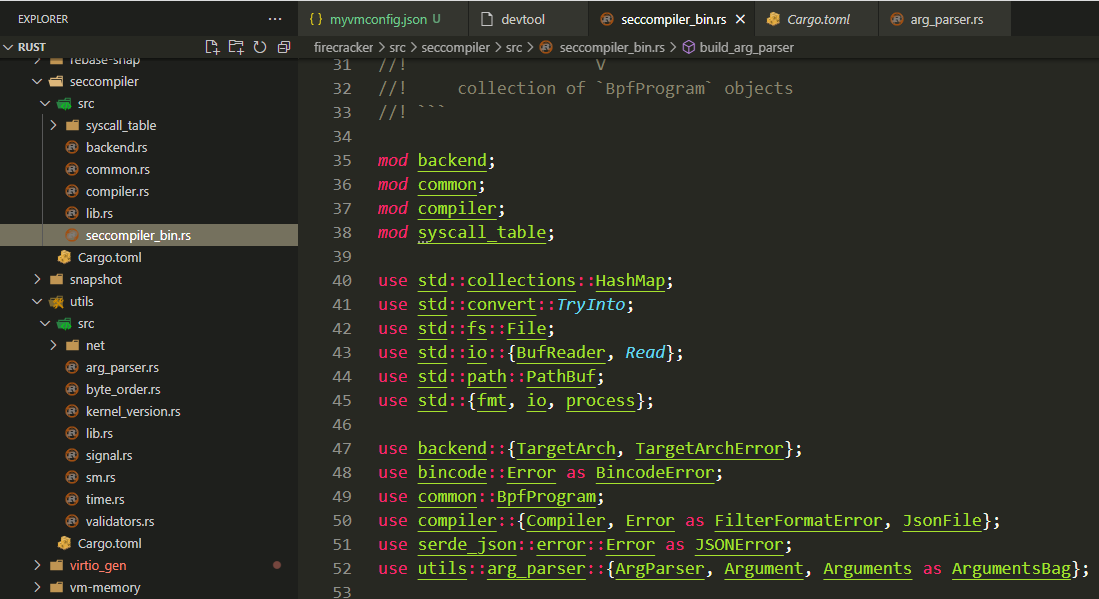
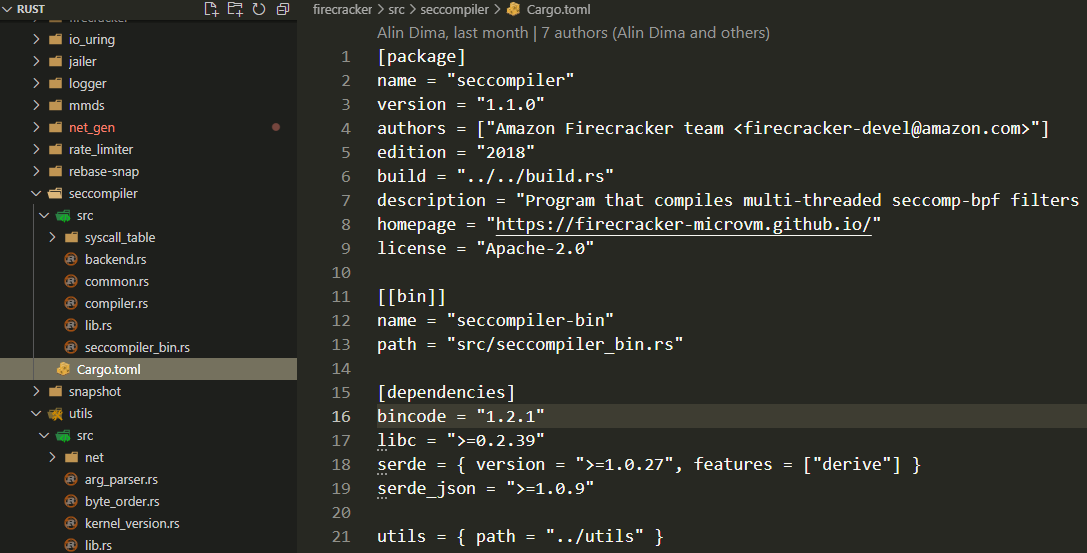
上面的图中:
- toml文件里的关键字都是规范定的, 见https://doc.rust-lang.org/cargo/reference/manifest.html
- Cargo.toml里面说这个seccompiler目录是个crate, 会产生一个seccompiler-bin文件, 产生这个bin的源文件是src/seccompiler_bin.rs; [[bin]]是个表数组, 表示可能会有多个bin.
- src里面每个文件名都是个mod
- 在主文件seccompiler_bin.rs里要声明这些mod
23.2. lib的例子
比如下面这个utils, 是多个工具库的集合. 因为都是库, 就没有一个叫utils.rs的文件
外部crate要引用其中某个库的时候, 用use utils::arg_parser::{ArgParser, Argument, Arguments as ArgumentsBag};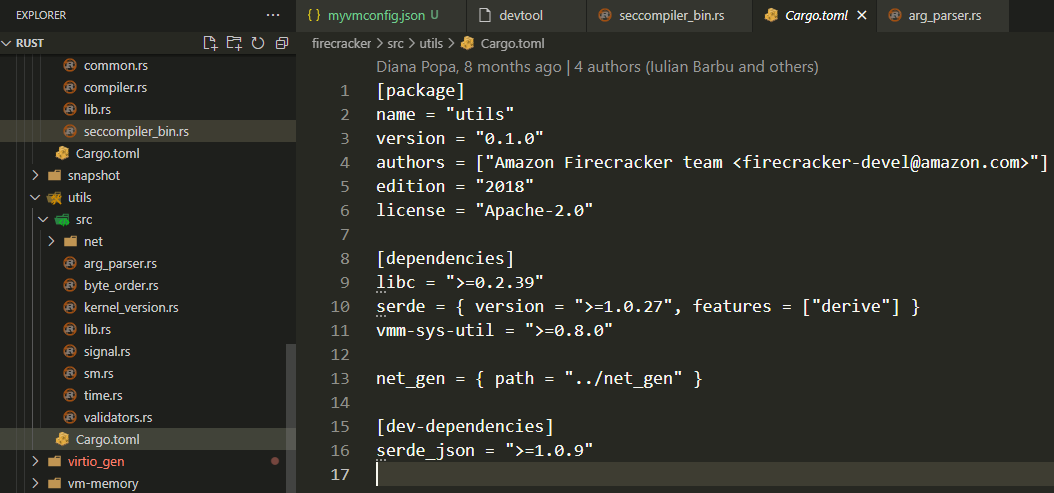
24. firecracker/src/utils/src/arg_parser.rs代码走读
24.1. use 使用了BTreeMap
use std::collections::BTreeMap;
use std::env;
use std::fmt;
use std::result;
24.2. 重定义了Result
std::result::Result是个泛型, 是对函数返回值的"标准"抽象
pub type Result<T> = result::Result<T, Error>; //这个Error就是下面的Error
arg_parser自己的Error定义: 其中每个field基本上都是"元组结构体"的形式:
/// Errors associated with parsing and validating arguments.
#[derive(Debug, PartialEq)]
pub enum Error {
    /// The argument B cannot be used together with argument A.
    ForbiddenArgument(String, String),
    /// The required argument was not provided.
    MissingArgument(String),
    /// A value for the argument was not provided.
    MissingValue(String),
    /// The provided argument was not expected.
    UnexpectedArgument(String),
    /// The argument was provided more than once.
    DuplicateArgument(String),
}
Error这个enum实现了fmt::Display
impl fmt::Display for Error {
    fn fmt(&self, f: &mut fmt::Formatter) -> fmt::Result {
        use self::Error::*;

        match *self {
            ForbiddenArgument(ref arg1, ref arg2) => write!(
                f,
                "Argument '{}' cannot be used together with argument '{}'.",
                arg2, arg1
            ),
            MissingArgument(ref arg) => write!(f, "Argument '{}' required, but not found.", arg),
            MissingValue(ref arg) => write!(
                f,
                "The argument '{}' requires a value, but none was supplied.",
                arg
            ),
            UnexpectedArgument(ref arg) => write!(
                f,
                "Found argument '{}' which wasn't expected, or isn't valid in this context.",
                arg
            ),
            DuplicateArgument(ref arg) => {
                write!(f, "The argument '{}' was provided more than once.", arg)
            }
        }
    }
}
这里面用了write!这个宏, 把一个formated文本写入f.
24.3. ArgParser对象
ArgParser对象是程序的命令行对象:
这里面一直都带着生命周期标记'a
/// Keep information about the argument parser.
#[derive(Clone, Default)]
pub struct ArgParser<'a> {
    arguments: Arguments<'a>,
}
arguments是个BTree
/// Stores the arguments of the parser.
#[derive(Clone, Default)]
pub struct Arguments<'a> {
    // A BTreeMap in which the key is an argument and the value is its associated `Argument`.
    args: BTreeMap<&'a str, Argument<'a>>,
    // The arguments specified after `--` (i.e. end of command options).
    extra_args: Vec<String>,
}
再里面的Argument是命令行的option的抽象:
/// Stores the characteristics of the `name` command line argument.
#[derive(Clone, Debug, PartialEq)]
pub struct Argument<'a> {
    name: &'a str,
    required: bool,
    requires: Option<&'a str>,
    forbids: Vec<&'a str>,
    takes_value: bool,
    allow_multiple: bool,
    default_value: Option<Value>,
    help: Option<&'a str>,
    user_value: Option<Value>,
}
24.4. ArgParser对象方法
所有对象方法都包在impl块中:
impl<'a> ArgParser<'a> {
}
24.4.1. new这个对象:
new返回Self本身, 而不能返回借用(&Self), 因为这个函数结束后, 所有local的东西都会被drop, 那显然就没有什么可以借用的.
    /// Create a new ArgParser instance.
    pub fn new() -> Self {
        ArgParser::default()
    }
24.4.2. 从命令行parse
从下面的函数能看到, ArgParser对象虽然只包括Arguments, 但明显没有继承. 所以这里还要显式的转一把:
    /// Parse the command line arguments.
    pub fn parse_from_cmdline(&mut self) -> Result<()> {
        self.arguments.parse_from_cmdline()
    }
24.4.3. 增加arg项
这里用了"瀑布式"的函数形式, 入参和出参都是Self类型:
这个过程发生了所有权转移, 这里的mut self入参会导致Self move, 但最后返回的时候又move出去了.
    /// Add an argument with its associated `Argument` in `arguments`.
    pub fn arg(mut self, argument: Argument<'a>) -> Self {
        self.arguments.insert_arg(argument);
        self
    }
调用形式, 在其他的模块中:
下面的连续.arg()调用, 我理解没有发生Self的拷贝.
fn build_arg_parser() -> ArgParser<'static> {
    ArgParser::new()
        .arg(
            Argument::new("input-file")
                .required(true)
                .takes_value(true)
                .help("File path of the JSON input."),
        )
        .arg(
            Argument::new("output-file")
                .required(false)
                .takes_value(true)
                .default_value(DEFAULT_OUTPUT_FILENAME)
                .help("Optional path of the output file."),
        )
        .arg(
            Argument::new("target-arch")
                .required(true)
                .takes_value(true)
                .help("The computer architecture where the BPF program runs. Supported architectures: x86_64, aarch64."),
        )
        .arg(
            Argument::new("basic")
                .takes_value(false)
                .help("Deprecated! Transforms the filters into basic filters. Drops all argument checks \
                and rule-level actions. Not recommended."),
        )
}
24.4.4. 格式化help output
    // Filter arguments by whether or not it is required.
    // Align arguments by setting width to length of the longest argument.
    fn format_arguments(&self, is_required: bool) -> String {
        let filtered_arguments = self
            .arguments
            .args
            .values() //这是个实体的Values<'a, K:  'a, V:  'a>, 实现了Iterator;
            //但它声明了自己实现了Iterator, 能编译过, 那就"继承"了Iterator的其他N多方法
            //比如就继承了下面的filter
            .filter(|arg| is_required == arg.required)
            .collect::<Vec<_>>(); //编译器会自动推导出返回类型是Vec<&Argument>

        let max_arg_width = filtered_arguments
            .iter()
            .map(|arg| arg.format_name().len())
            .max()
            .unwrap_or(0); //因为上面的max函数返回Option类型, 这里unwrap Some层, 取得raw数据.

        filtered_arguments
            .into_iter()
            .map(|arg| arg.format_help(max_arg_width))
            .collect::<Vec<_>>()
            .join("\n") //Vec<T>并没有join方法, 这里自动解引用了, 调用了[String]的join
    }
上面的Values是stable-x86_64-unknown-linux-gnu/lib/rustlib/src/rust/library/alloc/src/collections/btree/map.rs定义的结构体
pub struct Values<'a, K: 'a, V: 'a> {
    inner: Iter<'a, K, V>,
}
而且它还实现了Iterator
impl<'a, K, V> Iterator for Values<'a, K, V> {
}
在这里这个泛型结构体被实例化成了struct Values<&str, Argument>
那么这个struct Values<&str, Argument>对象就能享受Iterator的一系列方法
那么接下来的filter方法, 返回的Filter<Self, P>依旧是个Iterator
    fn filter<P>(self, predicate: P) -> Filter<Self, P>
    where
        Self: Sized,
        P: FnMut(&Self::Item) -> bool,
    {
        Filter::new(self, predicate)
    }
这里的Self就是struct Values<&str, Argument>对象本身, filter函数需要一个predicate(谓语)函数来执行filter的具体动作, 而它的入参是&Self::Item, 那么struct Values<&str, Argument>的Iterator关联类型是什么呢?
见下面, 是&'a V, 这里实例化后是&Argument
impl<'a, K, V> Iterator for Values<'a, K, V> {
    type Item = &'a V;

    fn next(&mut self) -> Option<&'a V> {
        self.inner.next().map(|(_, v)| v)
    }

    fn size_hint(&self) -> (usize, Option<usize>) {
        self.inner.size_hint()
    }

    fn last(mut self) -> Option<&'a V> {
        self.next_back()
    }
}
那么就能得出:
.filter(|arg| is_required == arg.required)
其中:
arg是struct Values<&str, Argument>的关联类型&Argument的借用, 即&&Argument- rust有自动解引用机制, 所以
arg.required可以直接用
24.5. Argument对象
这里全程都带生命周期标记, 怎么看着挺啰嗦的.
#[derive(Clone, Debug, PartialEq)]
pub struct Argument<'a> {
    name: &'a str,
    required: bool,
    requires: Option<&'a str>,
    forbids: Vec<&'a str>,
    takes_value: bool,
    allow_multiple: bool,
    default_value: Option<Value>,
    help: Option<&'a str>,
    user_value: Option<Value>,
}
25. test
这个文件1k多行, 有一般都是test
test从#[cfg(test)]开始
包在mod里面:
#[cfg(test)]
mod tests {
    use super::*;
    use crate::arg_parser::Value; //即使在同一个文件, 也要显式引用
}
测试项以
#[test]标记, 函数以test_开头fn test_value() { //Test `as_string()` and `as_flag()` functions behaviour. let mut value = Value::Flag; assert!(Value::as_single_value(&value).is_none()); value = Value::Single("arg".to_string()); assert_eq!(Value::as_single_value(&value).unwrap(), "arg"); value = Value::Single("arg".to_string()); assert!(!Value::as_flag(&value)); value = Value::Flag; assert!(Value::as_flag(&value)); }使用了大量的
assert_eq!宏, 比如:assert_eq!( arg_parser.formatted_help(), "optional arguments:\n \ --config-file <config-file> 'config-file' info.\n \ --id <id> 'id' info.\n \ --seccomp-filter <seccomp-filter> 'seccomp-filter' info." );判断Result是否ok
assert!(arguments.parse(&args).is_ok());没有看到golang类似的benchmark测试
26. std collections
代码在.rustup/toolchains/stable-x86_64-unknown-linux-gnu/lib/rustlib/src/rust/library/std/src/collections/mod.rs
主要是对其他crate的重新引用:
pub use alloc_crate::collections::{binary_heap, btree_map, btree_set};
pub use alloc_crate::collections::{linked_list, vec_deque};
pub use alloc_crate::collections::{BTreeMap, BTreeSet, BinaryHeap};
pub use alloc_crate::collections::{LinkedList, VecDeque};
pub use self::hash_map::HashMap;
pub use self::hash_set::HashSet;
Rust's collections can be grouped into four major categories:
- Sequences: Vec, VecDeque, LinkedList
- Maps: HashMap, BTreeMap
- Sets: HashSet, BTreeSet
- Misc: BinaryHeap
26.1. Sequences性能
| get(i) | insert(i) | remove(i) | append | split_off(i) | |
|---|---|---|---|---|---|
| Vec | O(1) | O(n-i) | O(n-i) | O(m) | O(n-i) |
| VecDeque | O(1) | O(min(i, n-i)) | O(min(i, n-i)) | O(m) | O(min(i, n-i)) |
| LinkedList | O(min(i, n-i)) | O(min(i, n-i)) | O(min(i, n-i)) | O(1) | O(min(i, n-i)) |
26.2. Maps性能
| get | insert | remove | range | append | |
|---|---|---|---|---|---|
| HashMap | O(1)~ | O(1)~ | O(1)~ | N/A | N/A |
| BTreeMap | O(log(n)) | O(log(n)) | O(log(n)) | O(log(n)) | O(n+m) |
27. BTreeMap
27.1. iter()
BTreeMap的iter()方法返回Iter<'_, K, V>结构体
这是个
pub struct Iter<'a, K: 'a, V: 'a> {
    range: LazyLeafRange<marker::Immut<'a>, K, V>,
    length: usize,
}
它实现了Iterator:
#[stable(feature = "rust1", since = "1.0.0")]
impl<'a, K: 'a, V: 'a> Iterator for Iter<'a, K, V> {
    type Item = (&'a K, &'a V);

    fn next(&mut self) -> Option<(&'a K, &'a V)> {
        if self.length == 0 {
            None
        } else {
            self.length -= 1;
            Some(unsafe { self.range.next_unchecked() })
        }
    }

    fn size_hint(&self) -> (usize, Option<usize>) {
        (self.length, Some(self.length))
    }

    fn last(mut self) -> Option<(&'a K, &'a V)> {
        self.next_back()
    }

    fn min(mut self) -> Option<(&'a K, &'a V)> {
        self.next()
    }

    fn max(mut self) -> Option<(&'a K, &'a V)> {
        self.next_back()
    }
}
BTreeMap的iter使用举例:
use std::collections::BTreeMap;

let mut map = BTreeMap::new();
map.insert(3, "c");
map.insert(2, "b");
map.insert(1, "a");

for (key, value) in map.iter() {
    println!("{}: {}", key, value);
}

let (first_key, first_value) = map.iter().next().unwrap();
assert_eq!((*first_key, *first_value), (1, "a"));
27.2. keys()和values()
BTreeMap还有keys()和values()方法, 分别返回keys和values. 比如:
    let mut a = BTreeMap::new();
    a.insert(2, "b");
    a.insert(1, "a");
    let keys = a.keys();
    let values = a.values();
    println!("{:?}", keys);
    println!("{:?}", values);
结果:
[1, 2]
["a", "b"]
key就是key, value就只有value, 很通顺.
但实际上, keys()和values()方法分别返回Keys和Values结构体, 而他们的内部都是inner: Iter<'a, K, V>
pub struct Keys<'a, K: 'a, V: 'a> {
    inner: Iter<'a, K, V>,
}

pub struct Values<'a, K: 'a, V: 'a> {
    inner: Iter<'a, K, V>,
}
区别在于它们各自实现的迭代器不同, 比如:
impl<'a, K, V> Iterator for Values<'a, K, V> {
    type Item = &'a V;

    fn next(&mut self) -> Option<&'a V> {
        self.inner.next().map(|(_, v)| v) //把(k,v)map成v
    }

    fn size_hint(&self) -> (usize, Option<usize>) {
        self.inner.size_hint()
    }

    fn last(mut self) -> Option<&'a V> {
        self.next_back()
    }
}